
GIF中都有些什么?
根据 spec-gif89a 规范,每一张 GIF 都会包含如下内容:

其中实线框里面的内容是必须存在的,虚线框中的内容则是可选的。接下来,我们会以一张简单的 GIF 文件来对各种模块的内容进行解析:

这是一张 10px * 10px 的 gif 图片,共四个颜色,平均分布在四个区域,非常简单的一张图片。通过以下代码将这张图片转成数据流:
html
<div class="img-wrapper" id="J_img-wrapper">
<img src="/1.gif" class="img" data-src="/1.gif" />
</div>
<script>
const oImgWrapper = document.querySelector('#J_img-wrapper')
oImgWrapper.addEventListener('click', async (e) => {
const { target } = e
if (target.classList.contains('img')) {
const blob = await fetch(target.getAttribute('data-src'))
.then(res => res.blob())
const fd = new FileReader()
fd.onload = function (e) {
const dataView = new DataView(e.target.result)
const reader = dataViewReader(dataView)
const data = reader.read(dataView.byteLength, 'hex')
console.log(data)
}
fd.readAsArrayBuffer(blob)
}
})
const decimal2hex = num => Math.min(255, Math.max(0, num)).toString(16).toUpperCase().padStart(2, '0')
const hex2decimal = hex => Math.min(255, Math.max(0, parseInt(hex, 16)))
function dataViewReader (dataView) {
let offset = 0
const byteLength = dataView.byteLength
return {
get isDone () {
return offset > byteLength - 1
},
read (length = 1, type = 'decimal') {
let len = length
const bytes = []
while (len > 0) {
if (this.isDone) {
throw new RangeError('Out of range.')
}
const byte = dataView.getUint8(offset)
bytes.push(type === 'hex' ? decimal2hex(byte) : byte)
offset++
len--
}
return length === 1 ? bytes[0] : bytes
}
}
}
</script>
通过以上的代码,可以得到下面图示的数据:
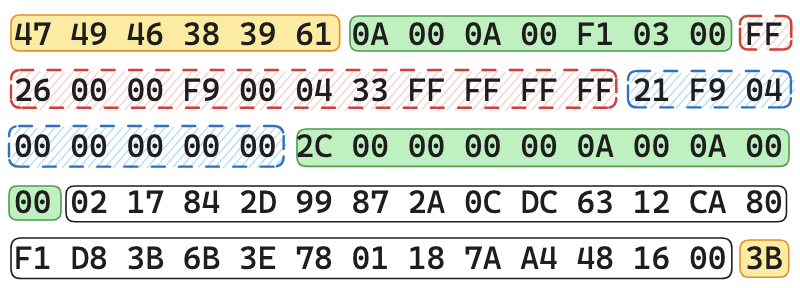
这张 GIF 图片它包含了 Header、Logical Screen Descriptor、Global Color Table、Graphic Control Extension、Image Descriptor、Image Data 和 Trailer 几个模块。
接下来我们就根据这张示例图来逐一理解各个模块里面的内容。
Header

每一个 GIF 数据流都会以一个 Header 开头,Header 中表明了当前数据流是一个 GIF 的数据流,一共包含 6 个字节的数据。
前 3 个表示 GIF 签名:47 49 46,在 ASCII 表里可以找到,分别对应的是 ‘G’、‘I’、‘F’ 三个字符(需要注意的是,这里的 47 49 46 是十六进制的数据,在查找 ASCII 表时需要转换成对应的十进制值去查找,也就是:71, 73, 70);
后面 3 个 38 39 61 表示版本 (89a) 或者是 38 37 61 (87a),它指示着我们在编码时应该依照什么标准来处理。
Logical Screen Descriptor

紧跟着 Header 的是逻辑屏幕描述符,它一共有 7 个字节:

- 前 2 个字节
0A 00:表示逻辑屏幕宽度,计算方式为255 * byte2 + byte1 + byte2,也就是255 * 00 + 0A + 00 = 255 * 0 + 10 = 10,所以它的宽度就是 10px; - 第 3、4字节
0A 00:表示逻辑屏幕高度,换算之后也是 10px; - 第 5 个字节
F1:它是一个打包字段,需要转换成二进制,也就是11110001- 第 1 位
1:指示接下来是否存在全局的颜色表,1 表示有,0 则表示无; - 第 2 ~ 4 位
111:原始图像可用的每种原色的位数减 1。该值表示从中选择图形中颜色的整个调色板的大小,而不是图形中实际使用的颜色数。 例如,如果此字段中的值为 3,则原始图像的调色板每个原色有 4 位可用于创建图像。 该值应设置为指示原始调色板的丰富度,即使整个调色板中的每种颜色在源计算机上并不可用; - 第 5 位
0:指示全局颜色表是否已排序,0 表示没有,1 表示按重要性递减排序,最重要的颜色排在第一位; - 第 6 ~ 8 位
001:表示全局颜色表的长度,这个值在 Global color table flag 为 1 时生效,结合上文,我们可以看到 Global color table flag 的值为 1,也就是说这个长度值是有效的,001转换成十进制就是1。全局颜色表的长度计算公式为:3 * 2 ^ (size + 1),其中乘以 3 是因为每一个颜色都是由r、g、b这 3 个数据组成的,所以在当前的 GIF 图片中全局颜色表的长度为:3 * 2 ^ (1 + 1) = 12。
- 第 1 位
- 第 6 个字节
03:表示背景颜色在全局颜色表中的索引,这个值用于屏幕上没有被图像覆盖的像素。如果 Global color table flag 为 0 时,这个值应该被忽略; - 最后 1 个字节
00:用于计算原始图像中像素长宽比的近似值的因子。 如果该字段的值不为 0,则根据以下公式计算长宽比的近似值:Aspect Ratio = (Pixel Aspect Ratio + 15) / 64。像素长宽比定义为像素宽度除以高度的商。 该字段中的值范围允许以 1/64 的增量指定最宽像素 4:1 到最高像素 1:4。
我们可以根据以下代码来解析逻辑屏幕描述符中的内容:
js
// 逻辑屏幕描述符
const decimal2Uint8Array = (num, size = 8) => {
const arr = new Uint8Array(size)
let len = size - 1
while (num > 0) {
arr[len--] = num % 2
num = num / 2 >> 0
}
return arr
}
const uint8Array2decimal = (arr = []) =>
arr.reduce((acc, val, index, source) =>
acc + (
val === 1
? 2 ** (source.length - 1 - index)
: 0
)
, 0)
const [w0, w1, h0, h1, packedFields, bgIndex, pixelAspectRatio] = ['0A', '00', '0A', '00', 'F1', '03', '00'].map(val => parseInt(val, 16))
const width = 255 * w1 + w0 + w1
const height = 255 * h1 + h0 + h1
const unpackedFields = decimal2Uint8Array(packedFields)
const globalColorTableFlag = unpackedFields[0]
const colorResolution = uint8Array2decimal(unpackedFields.slice(1, 3)) + 1
const sortFlag = unpackedFields[4]
const sizeOfGlobalColorTable = uint8Array2decimal(unpackedFields.slice(4))
console.log({
width,
height,
globalColorTableFlag,
colorResolution,
sortFlag,
sizeOfGlobalColorTable: globalColorTableFlag ? 3 * (2 ** (sizeOfGlobalColorTable + 1)) : 0,
bgIndex,
pixelAspectRatio: (pixelAspectRatio + 15) / 64
})
Global Color Table

当 Global color flag 为 1 并且 Size of global color table 的值不为 0 时,全局颜色表就会存在,并且紧跟在逻辑屏幕描述符后面。在这个示例中,我们取到了 12 个字节长度的数据。每 3 个字节表示一个颜色,所以可以得出下面的颜色数据:
js
globalColorTable = ['#FF2600', '#00F900', '#0433FF', '#FFFFFF']
Graphics Control Extension

图形控制扩展包含处理图形渲染块时使用的参数,它是一个可选的块,所有的扩展块都会以 0x21 开头,而图形控制扩展块在 0x21 之后会跟随着一个 0xF9,表示它是一个图形控制扩展块。
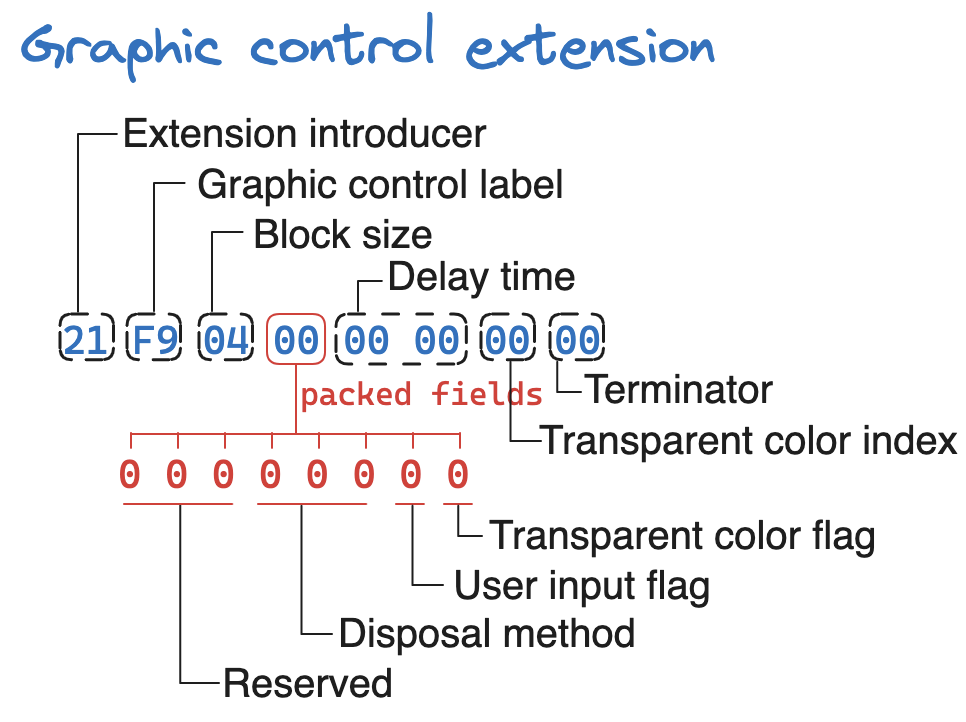
- 第 1 个字节
21:表明接下来的数据是一个扩展块; - 第 2 个字节
F9:表明当前块是一个图形控制扩展块; - 第 3 个字节
04:表示当前块的剩余字节的长度(不包含 Terminator); - 第 4 个字节
00:它是一个打包字段:- 第 1 ~ 3 位
000:是一个保留的数据,当前版本无需理会; - 第 4 ~ 6 位
000:指示图形显示后的处理方式:- 0:没有指定处理,解码器无需做任何操作;
- 1:不要处置,图形要留在原处;
- 2:恢复为背景色,图形所使用的区域必须还原为背景色;
- 3:恢复到以前,需要解码器来恢复被图形覆盖的区域,该区域在呈现图形之前存在;
- 4 ~ 7:保留值。
- 第 7 位
0:指示在继续之前是否需要等待用户输入,如果设置了该标志,则在输入用户输入时将继续处理,用户输入的性质由应用程序决定(回车、点击鼠标按钮等); - 第 8 位
0:透明颜色的索引,这个索引是指在索引流里面的值(这个在后面讲到索引流时再详细讲解),并非是颜色表中的索引。
- 第 1 ~ 3 位
我们可以通过下面的方式来解析当前扩展块的内容:
js
const [introducer, label, size, packedFields, t0, t1, transparentColorIndex, terminator] = ['21', 'F9', '04', '00', '00', '00', '00', '00'].map(val => parseInt(val, 16))
const unpackedFields = decimal2Uint8Array(packedFields)
const reserved = unpackedFields.slice(0, 3)
const disposalMethod = uint8Array2decimal(unpackedFields.slice(3, 6))
const userInputFlag = unpackedFields[6]
const transparentColorFlag = unpackedFields[7]
const delayTime = 255 * t1 + t0 + t1
console.log({
introducer,
label,
size,
terminator,
delayTime,
transparentColorIndex,
reserved,
disposalMethod,
userInputFlag,
transparentColorFlag
})
Image Descriptor
在数据流中,每一帧的图像都会由一个 Image descriptor、一个可选的本地颜色表和图片数据组成。
数据流中的每一帧图像都必须有一个描述符。

Image Descriptor 块一共包含 10 个字节的数据:
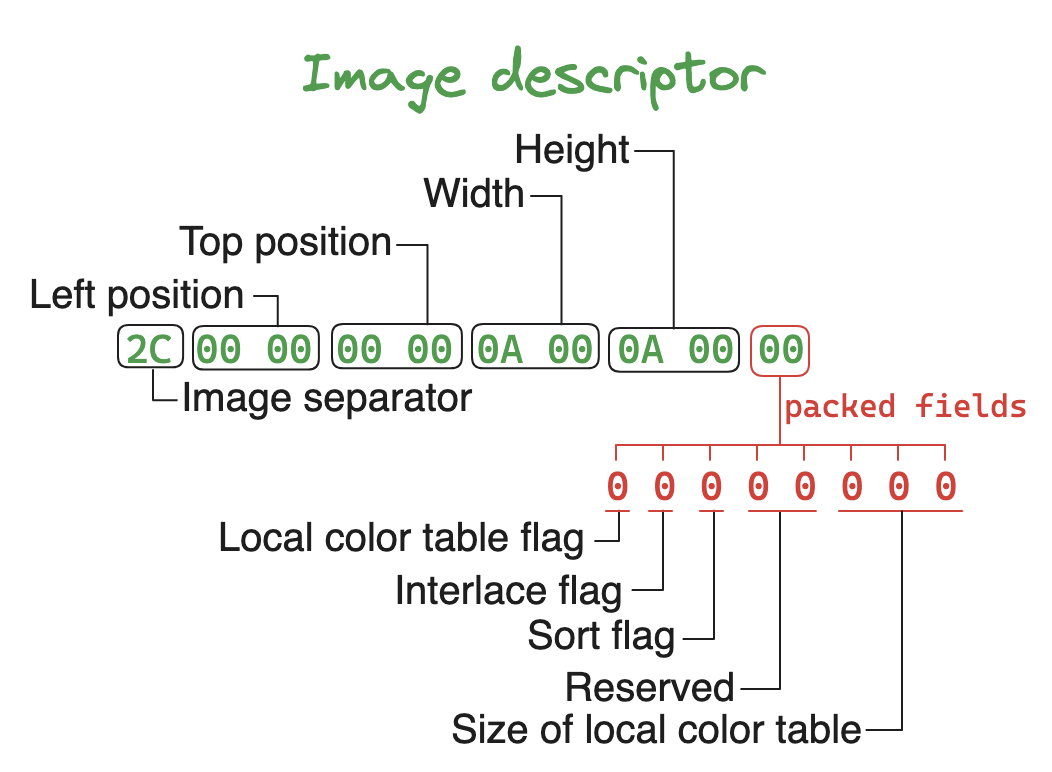
- 第 1 个字节
2C:表示一个 Image descriptor 块的开始; - 第 2 ~ 3 个字节
00 00:当前帧图像的位于 GIF 图片中的 left 坐标; - 第 4 ~ 5 个字节
00 00:当前帧图像的位于 GIF 图片中的 top 坐标; - 第 6 ~ 7 个字节
0A 00:当前帧图像的宽度; - 第 8 ~ 9 个字节
0A 00:当前帧图像的高度; - 第 10 个字节
00:是一个打包字段:- 第 1 位
0:本地颜色表标记,如果值为 1,则 Image descriptor 后面会跟随着一个本地颜色表的数据; - 第 2 位
0:表示图像是否交错,具体的解释可以看规范中的附录 E; - 第 3 位
0:是一个排序标记,和 Global color table 中的作用一样; - 第 4 ~ 5 位
00:保留值; - 第 6 ~ 8 位
000:表示本地颜色表的长度,和 Global color table 中的一样。
- 第 1 位
我们可以用以下代码来解析这个块的数据:
js
const [separator, l0, l1, t0, t1, w0, w1, h0, h1, packedFields] = ['2C', '00', '00', '00', '00', '0A', '00', '0A', '00', '00'].map(val => parseInt(val, 16))
const left = 255 * l1 + l0 + l1
const top = 255 * t1 + t0 + t1
const width = 255 * w1 + w0 + w1
const height = 255 * h1 + h0 + h1
const unpackedFields = decimal2Uint8Array(packedFields)
const localColorTableFlag = unpackedFields[0]
const interlaceFlag = unpackedFields[1]
const sortFlag = unpackedFields[2]
const reserved = unpackedFields.slice(3, 5)
const sizeOfLocalColorTable = uint8Array2decimal(unpackedFields.slice(5))
console.log({
separator,
left,
top,
width,
height,
localColorTableFlag,
interlaceFlag,
sortFlag,
reserved,
sizeOfLocalColorTable: localColorTableFlag ? 3 * (2 ** (sizeOfLocalColorTable + 1)) : 0
})
需要注意的时,不同帧的图像,它们所处的位置、宽高都可能不一样,这是由当前帧图像对上一帧图像的复用程度所决定的。
Local Color Table
本地颜色表和全局颜色表的解析一样。不过,它是否存在得看 Image Descriptor 中的 Local Color Table Flag 的值。当本地颜色表存在时,解析当前帧的图像应该使用本地颜色表。
Table Based Image Data
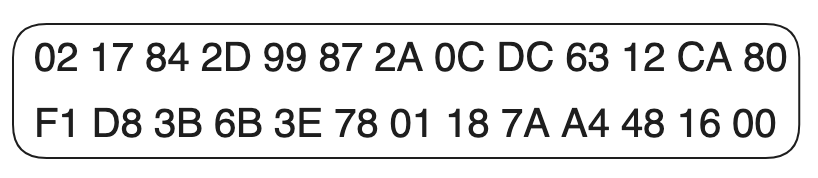
每一帧的图像数据都会紧跟着 Image Descriptor 出现(如果存在 Local color table ,它就会在 Local color table 后面)。
第一个字节表示 LZW minimum code size,这个字节决定了图像数据中用于LZW编码的初始比特数(这个会留到 LZW 算法里面详细说明)。
接下来的就是表示图像数据的,它由多个数据子块(Data Sub-block)组成。
- 每一个子块都会由一个表示长度的字节开始,它代表着当前子块的字节数(不含长度)
- 根据长度读取完当前子块的数据后,如果下一个字节不是 00,那么接下来的数据将会是下一个子块的数据。
- 直到读取完所有子块数据,并遇到 00 后结束。
最后一个字节是 00 表示当前图像数据块结束了。
我们通过以下代码来解析:
js
const reader = {
data: [
'02', '17', '84', '2D', '99', '87', '2A', '0C', 'DC', '63', '12', 'CA', '80',
'F1', 'D8', '3B', '6B', '3E', '78', '01', '18', '7A', 'A4', '48', '16', '00'
].map(val => parseInt(val, 16)),
read (size = 1) {
if (size === 1) {
return this.data.shift()
}
return this.data.splice(0, size)
}
}
const LZWMinimumCodeSize = reader.read()
const subBlocks = []
let currentByte = reader.read()
while (currentByte !== 0) {
subBlocks.push([
currentByte,
...reader.read(currentByte)
])
currentByte = reader.read()
}
console.log({
LZWMinimumCodeSize,
subBlocks,
terminator: currentByte
})
可以看到,这张示例图像只有一个子块数据:17 84 2D 99 87 2A 0C DC 63 12 CA 80 F1 D8 3B 6B 3E 78 01 18 7A A4 48 16。
具体如何解析这个子块里面的内容,会在后面的 [LZW 算法](#LZW image data)里面讲。
Plain Text Extension
我们会跳过这个块的内容(日后遇到有这个扩展块的内容再研究)。这个块会以 0x21 开头,紧接着是 0x01 用来表示当前是纯文本扩展块,下面是对这个扩展块的图解:
可以通过以下方式来获取当前扩展块的数据:
js
const getPlainTextExtension = reader => {
const introducer = 0x21
const label = 0x01
const size = reader.read() // always 12
const [gl0, gl1, gt0, gt1, gw0, gw1, gh0, gh1, characterCellWidth, characterCellHeight, foregroundColorIndex, backgroundColorIndex] = reader.read(size)
const gridLeft = 255 * gl1 + gl0 + gl1
const gridTop = 255 * gt1 + gt0 + gt1
const gridWidth = 255 * gw1 + gw0 + gw1
const gridHeight = 255 * gh1 + gh0 + gh1
// 接下来的是 sub-blocks
const subBlocks = []
let subBlockSize = reader.read()
while (subBlockSize !== 0) {
subBlocks.push([subBlockSize, ...reader.read(subBlockSize)])
subBlockSize = reader.read()
}
return {
introducer,
label,
gridLeft,
gridTop,
gridWidth,
gridHeight,
characterCellWidth,
characterCellHeight,
foregroundColorIndex,
backgroundColorIndex,
subBlocks,
terminator: subBlockSize
}
}
Application Extension
该规范允许应用程序特定的信息嵌入到GIF文件本身。唯一可以找到的应用程序扩展是 NETSCAPE2.0 扩展,并且指示着该如何循环一个 GIF 文件。
示例文件并未包含这个扩展块,我从其它文件偷了一段过来:
plain-text
21 FF 0B 4E 45 54 53 43 41 50 45 32 2E 30 03 01 00 00 00
下面是图解:
和其他的扩展块一样,应用扩展块也是以 0x21 开头,接着是 Label 0xFF,然后是长度(从 size 到 subBlocks 前的长度,它总是 21),之后就是 subBlocks。
需要注意的是在这个扩展块中的 Sub-blocks 中似乎只会包含一个子块,它的第一个字节是 03 表示这个子块的长度,接着总是跟着一个 01,后面两个字节 00 00 表示的是当前图片需要循环的次数,当它为 0 时,表示这张图片会一直循环。
下面是这个扩展块的解析代码:
js
const parseApplicationExtension = reader => {
const introducer = 0x21
const label = 0xFF
const size = reader.read() // always 11
const stack = reader.read(size)
console.log({ stack: stack.map(val => decimal2hex(val)) })
const identifier = stack.slice(0, 8).map(val => String.fromCodePoint(val)).join('')
const authCode = stack.slice(8).map(val => String.fromCodePoint(val)).join('')
// 接下来的是 sub-blocks
let cycleIndex = 0 // 循环次数,0 表示一直循环
const subBlocks = []
let subBlockSize = reader.read()
while (subBlockSize !== 0) {
subBlocks.push([subBlockSize, ...reader.read(subBlockSize)])
subBlockSize = reader.read()
}
// 看起来似乎只有一个 block 是在指示着动画应该循环几次
// 所以只取第 0 项
if (subBlocks.length > 0) {
const [, , t0, t1] = subBlocks[0]
cycleIndex = 255 * t1 + t0 + t1
}
return {
introducer,
label,
identifier,
authCode,
subBlocks,
cycleIndex,
terminator: subBlockSize
}
}
Comment Extension
最后一个扩展块便是这注释扩展块了,这块的内容不会展示在图像上,或许可以做一些隐写之类的东西。
注释模块的 Label 0xFE,然后是 Sub-blocks,可以用下面的方式来解释当前块的内容:
js
const parseCommentExtension = reader => {
const introducer = 0x21
const label = 0xFF
const subBlocks = []
let subBlockSize = reader.read()
while (subBlockSize !== 0) {
subBlocks.push([subBlockSize, ...reader.read(subBlockSize)])
subBlockSize = reader.read()
}
const comment = subBlocks.reduce((acc, item) => {
acc.push(...item.slice(1))
}, []).join('')
return {
introducer,
label,
subBlocks,
comment,
terminator: subBlockSize
}
}
Trailer
这个值永远都是 0x3B,表示图像解析完毕。
LZW image data
GIF 中使用的 LZW 算法在算法上与标准的 LZW 算法匹配,但存在以下差异:
- 定义了一个特殊的 code:Clear Code,它会将所有压缩/解压缩时的参数和表重置为初始状态。它的值为
2 ^ LZW minimum code size。Clear Code 可以出现在图像数据流中的任何位置,因此需要 LZW 算法来处理后续代码,就像是新启动一个数据流一样。编码器应该输出 Clear Code 作为每个图像数据流(Code Stream)的第一个代码; - 定义了一个 End of Information Code,它明确指示图像数据流的结束。当遇到此代码时,LZW 处理应该终止。它必须是编码器为图像输出的最后一个代码。它的值为
Clear Code + 1; - 第一个可用的压缩代码值为
Clear Code + 2; - 输出代码的长度(first code size)是可变的,从(
LZW Minimum code size + 1) 位开始,最多每个代码 12 位。这也意味着 **Code Table ** 中最大的代码值是 4095(0xFFF),每当 LZW 代码超过当前代码长度时,代码长度就会增加 1。然后需要根据新的代码长度来打包/解包。
| LZW Min Code Size | Codes | Clear Code | EOI Code |
|---|---|---|---|
| 2 | 0 ~ 3 | 4 | 5 |
| 3 | 0 ~ 7 | 8 | 9 |
| 4 | 0 ~ 15 | 16 | 17 |
| 5 | 0 ~ 31 | 32 | 33 |
| 6 | 0 ~ 63 | 64 | 65 |
| 7 | 0 ~ 127 | 128 | 129 |
| 8 | 0 ~ 255 | 256 | 257 |
压缩
我们都知道,每一张图片都是由一批的像素点组成的,每个像素点都有对应的颜色。
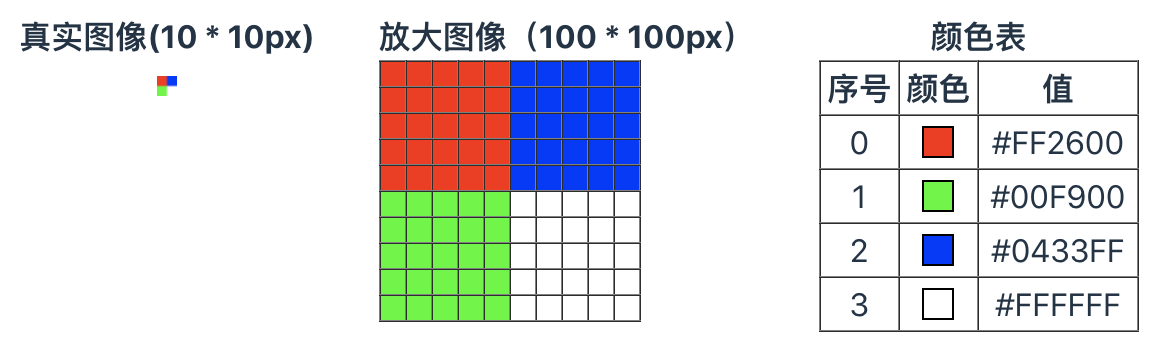
为了方便查看,我将图像放大了10倍,并增加了辅助线,每一个格子都对应着原图像中的一个像素点。
将图像中的每一个像素的颜色都替换成颜色表中对应颜色的序号,我们可以得到以下的数据:
plain-text
0 0 0 0 0 2 2 2 2 2
0 0 0 0 0 2 2 2 2 2
0 0 0 0 0 2 2 2 2 2
0 0 0 0 0 2 2 2 2 2
0 0 0 0 0 2 2 2 2 2
1 1 1 1 1 3 3 3 3 3
1 1 1 1 1 3 3 3 3 3
1 1 1 1 1 3 3 3 3 3
1 1 1 1 1 3 3 3 3 3
1 1 1 1 1 3 3 3 3 3
我们将这个数据命名为 Index Stream,也就是即将进行压缩的数据流。
在进行压缩之前,需要再定义几个术语:
-
Code Table:压缩方法中必须要建立一个 code table,它允许我们使用特殊的代码来表示一个颜色序列,而不是一次只表示一个颜色。code table 通过 lzw minimum code size 来初始化,并且会在后面加入
Clear Code以及End of Information code,如示例中的 lzw minimum code size 为 2,可以得到下面一个表格:code value 0 0 1 1 2 2 3 3 4 Clear Code 5 End of Information Code 从这里也可以看出,为什么第一个可用的压缩代码是
Clear Code + 2; -
Index Buffer:缓存着当前正在读取的索引,包含一个或多个颜色索引;
-
K:一个临时变量;
-
Code Stream:存储生成的 code,最终会依赖这个数据来打包成图片中的字节数据。
接下来需要做的事情就是把 Index Stream 通过 LZW 算法来进行压缩,下面给出了压缩过程:
- 初始化 Code Table;
- 输出 Clear Code 到 Code Stream 中;
- 从 Index Stream 中读取第一个值,并把它放到 Index Buffer 里面;
- <循环点>
- 从 Index Stream 中读取下一个值,命名为 K;
- 判断:Index Buffer 和 K 组成的值是否在 Code Table 中
- 是
- 把 K 放到 Index Buffer 后面;
- 否
- Code Table 新增一行数据,code 自增,value 为 Index Buffer + K;
- 将 Index Buffer 中的*代码(指的是 CodeTable 中 值为 Index Buffer 的那一项的 code)*输出到 Code Stream;
- Index Buffer 设置为 K;
- K 设置为 null;
- 是
- 如果有 Index Stream 还有更多值,返回循环点,继续循环;
- 输出 Index Buffer 中的内容到 Code Stream;
- 输出 End of Information Code 到 Code Stream;
跟着上面的步骤来走两步:
首先是初始化一个 Code Table:
js
const initCodeTable = minCodeSize => {
let clearCode = 2 ** minCodeSize
const table = []
for (let i = 0; i < clearCode; i++) {
table.push({
code: i,
value: [i]
})
}
table.push({
code: clearCode,
value: ['Clear Code']
}, {
code: clearCode + 1,
value: ['EOI']
})
return table
}
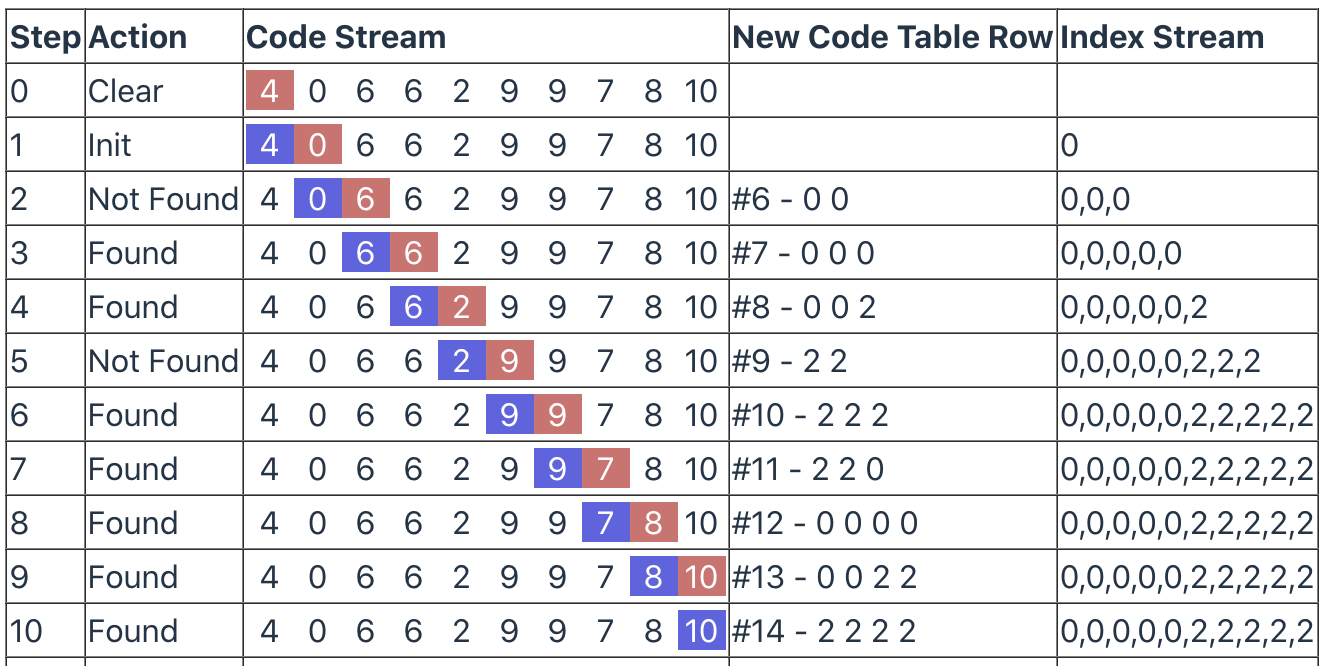
在此之前,先剧透一个步骤图(这个图在后续的代码中会生成),在图中的 Index Stream 列里面使用红色的背景标记了当前的 Index Buffer 包含的内容,而蓝色的背景标记着 K 的内容:
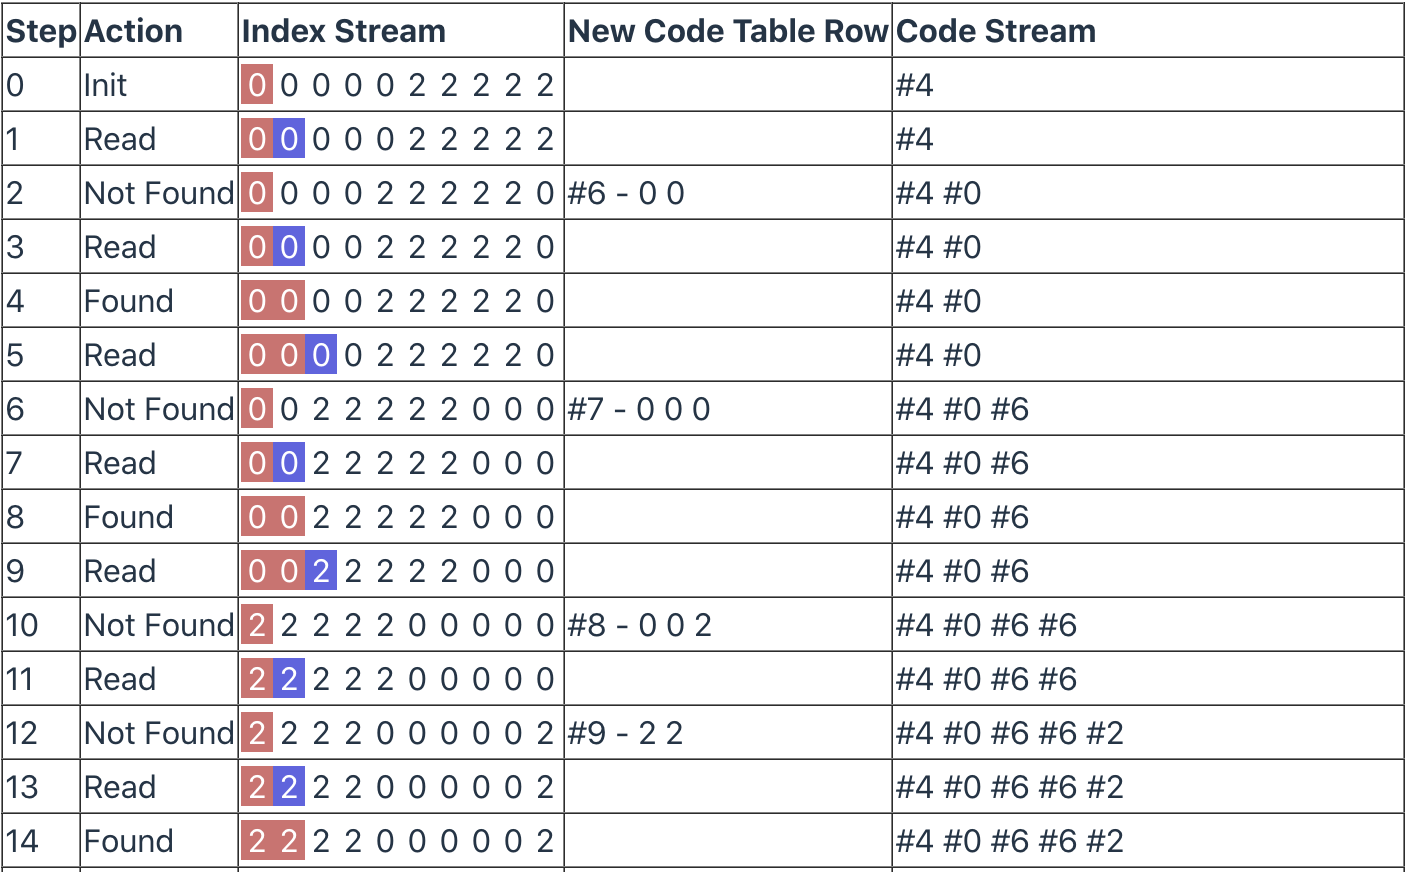
接着是往 Code Stream 中输出一个 Clear Code,也就是 #4(加入 # 号是为了表明它是一个 code );
然后是从 Index Stream 中读取第一个值,缓存到 Index Buffer 中,在图中则是 step 0;
接下来进入算法的主循环,读取下一值,将其命名为 K,也就是 step 1;完成这一步后需要拿 Index Buffer 和 K 的值(此时的值是:0,0)在 Code Table 中查找是否存在对应的 Code。
很显然在目前的 Code Table 中,并不存在对应的内容,进入*“否”*的分支:将 Index Buffer 和 K 的值加入 Code Table 中,此时 Code Table 中的数据应该如下:
json
[
{ "code": 0, "value": [0] },
{ "code": 1, "value": [1] },
{ "code": 2, "value": [2] },
{ "code": 3, "value": [3] },
{ "code": 4, "value": ["Clear Code"] },
{ "code": 5, "value": ["EOI"] },
{ "code": 6, "value": [0, 0] },
]
将 Index Buffer 在 Code Table 中对应的代码输出到 Code Stream,此时 Index Buffer 的内容是 [0],对应的 code 是 0,所以 Code Stream 中的代码应该是:#4 #0;然后是将 Index Buffer 设置为 K,K 清空:
js
indexBuffer = [k] // => [0]
k = null
分支代码结束 step 2,返回循环点;
第 2 次循环,K 依然取到的是 0,这一步发生在 step 3,而 Index Buffer 此时为 [0],此时Index Buffer 和 K 组成的值为 [0, 0],显然可以在 Code Table 中找到,进入*“是”*分支:
将 K 放入到 Index Buffer 中:
js
indexBuffer = [...indexBuffer, k] // => [0, 0]
分支代码结束 step 4,返回循环点。后面的步骤就不一一分析了,在最后,我们应该会得到 Code Stream 如下:
plain-text
#4 #0 #6 #6 #2 #9 #9 #7 #8 #10 #2 #12 #0 #14 #15 #12 #18 #16 #18 #1 #24 #24 #3 #27 #27 #25 #26 #28 #3 #30 #1 #32 #33 #30 #36 #34 #36 #5
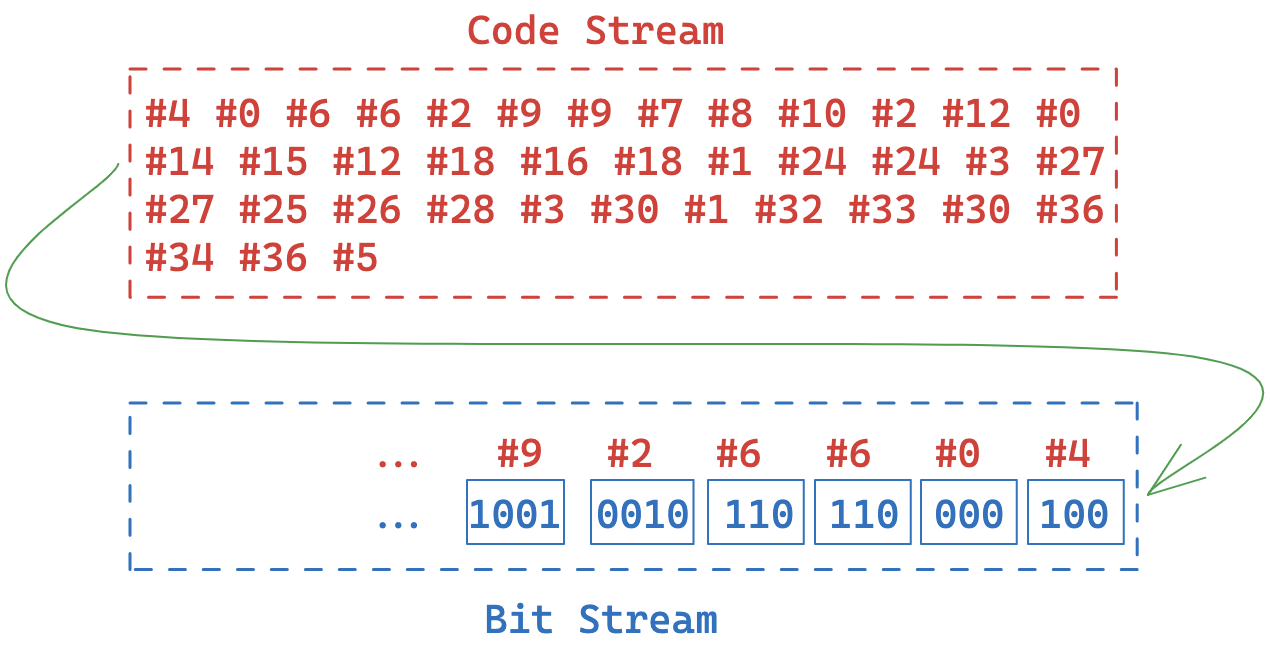
压缩的过程也就结束了,接下来就需要把 Code Stream 的内容转换成最终的存储数据,在转换期间,需要先将 Code Stream 转换成一个 Bit Stream ,然后再将 Bit Stream 进行打包。
将 Code Stream 转成 Bytes
我们都知道,在计算机中只认识 0 1,所以我们需要把 Code Stream 中的数据转换后进行存储。可能你会认为直接将其转换即可,但是这会超出最大的位数限制(如 #256 会转换成 1 0000 0000)它将会超出 8 位;并且在 Code Stream 中第一个代码是 #4,它会转换成 0000 0100,而最大的一个 code 是 #36,也就是 0010 0100,如果我们就这样将其存储到计算机上,无疑会造成空间的浪费,这也就是为什么 LZW 算法中使用的是灵活的代码大小。
灵活的代码大小允许我们进一步压缩空间,使用最小的位来存储 Code Stream 中的数据,如 #4 完全可以使用 100 来存储 ,而 #36 也可以使用 10 0100 来存储,这样就可以节省很多的空间。当然,具体使用多少位来存储这个 code 是要依据当前的代码大小来决定的,也就是上面说的 first code size,它是一个动态的值,会根据 Code Table 中新增的内容而变化。
一开始的 first code size 的值为 lzw minimum code size + 1 = 3,它也是这样定义的,所以 #4 应当被转换成 100。而 first code size 在什么时候会发生变化呢?
注意步骤图中的 step 10,在那一步给 Code Table 增加了一行 code 为 #8 的数据,它满足了 8 >= 2 ^ firstCodeSize 这一条件限制,意味着接下来使用 3 位来存储已经无法满足接下来的数据,所以需要将 first code size + 1 来存储后面的 code(step 11 中 Code Stream 新增的 #2 则需要转成 0010 来存储)。下表给出 Code Stream 中部分代码的转换过程:
| Code Stream | first code size | bits |
|---|---|---|
| #4 | 3 | 100 |
| #0 | 3 | 000 |
| #6 | 3 | 110 |
| #6 | 3 | 110 |
| #2 | 4 | 0010 |
| #9 | 4 | 1001 |
| … | … | … |
需要注意的是,从 Code Stream 中取值是顺序取的,但是将 bits 存储到 Bit Stream 里面是是从后往前放置的,看下图:
然后在我们将 Bit Stream 转成 Bytes 时,也是从后面开始取,每次取 8 位,从前往后放置,如下图:
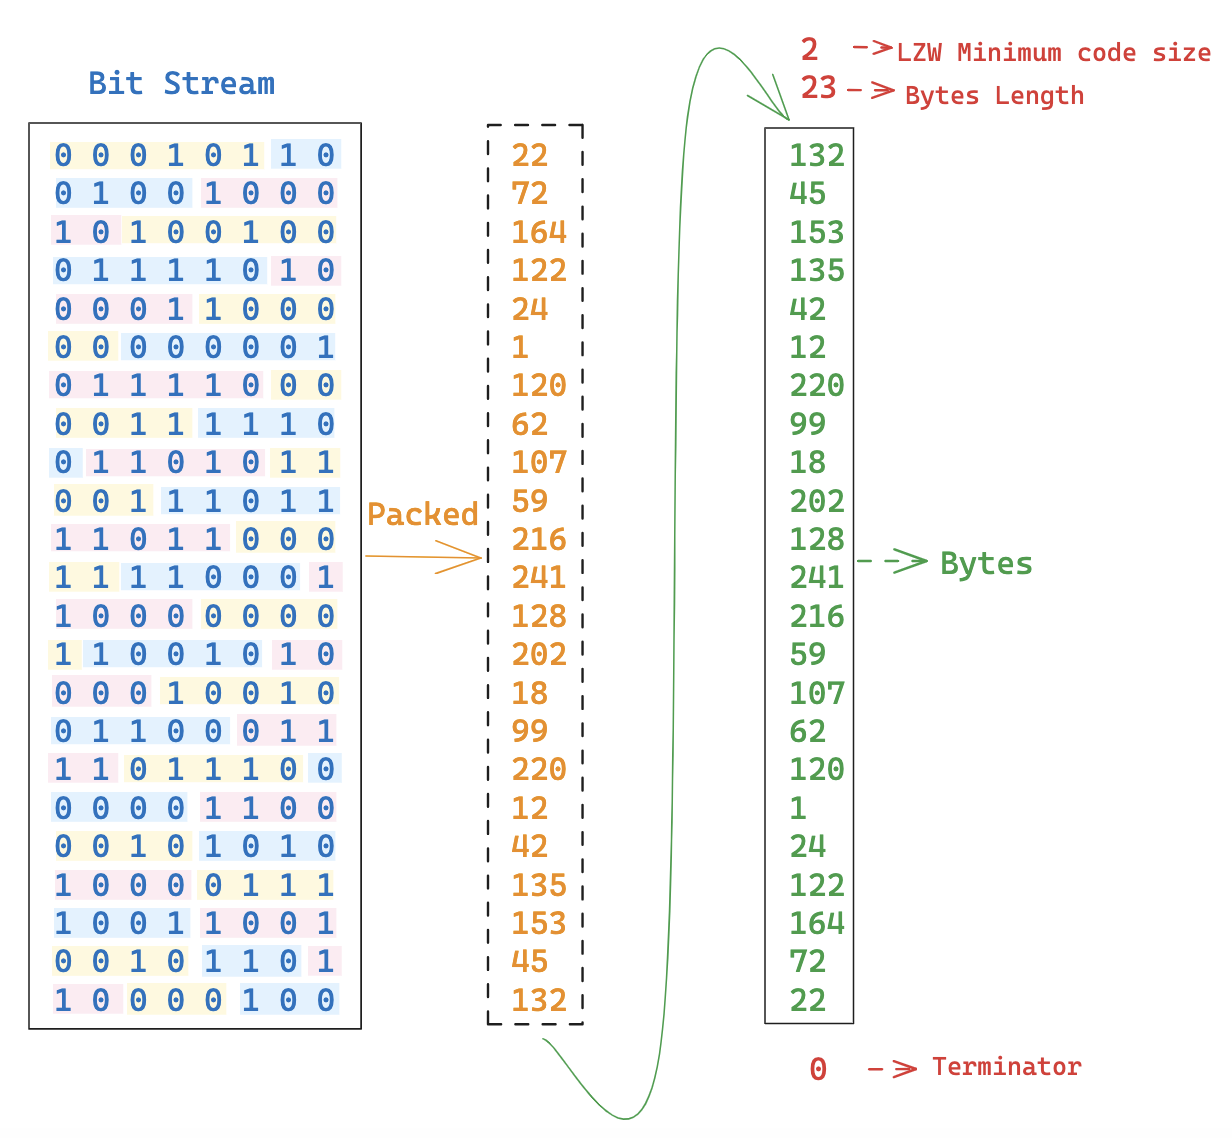
最终我们得到的 Bytes 数据如下:
plain-text
2 23 132 45 153 135 42 12 220 99 18 202 128 241 216 59 107 62 120 1 24 122 164 72 22 0
下面是完整的压缩流程代码,为了便于理解,在对压缩步骤的现实中加入了一些收集数据(使用 <收集器> 标记的代码,随时可以移除):
一些辅助函数:
js
const createContext = (indexStream, minCodeSize) => {
return {
data: indexStream,
index: 0,
isEnd () {
return this.index >= this.data.length
},
read () {
return this.data[this.index++]
},
firstCodeSize: minCodeSize + 1,
codeUnits: [
{
codeStream: [],
codeTable: initCodeTable(minCodeSize),
// <收集器> 创建一个步骤数据收集器,用于收集每一步的信息
stepCollection: createStepCollection(indexStream)
}
],
increase () {
this.firstCodeSize++
},
reset () {
// 重置 code stream、 code table 和最小代码
this.firstCodeSize = minCodeSize + 1
this.codeUnits.push({
codeStream: [],
codeTable: initCodeTable(minCodeSize),
// <收集器> 创建一个步骤数据收集器,用于收集每一步的信息
stepCollection: createStepCollection(indexStream)
})
},
// 收集 bit 数据,之后组装成 bytes
bitStream: [],
get codeStream () {
return this.codeUnits.at(-1).codeStream
},
get codeTable () {
return this.codeUnits.at(-1).codeTable
},
// <收集器> 当前单元收集器
get stepCollection () {
return this.codeUnits.at(-1).stepCollection
},
// <收集器> 收集
collect (action, indexBufferIndexes, kIdx, newCodeTableRow) {
this.stepCollection.collect(
action,
this.index - 1,
indexBufferIndexes,
kIdx,
newCodeTableRow,
this.codeStream
)
}
}
}
const initCodeTable = minCodeSize => {
let clearCode = 2 ** minCodeSize
const table = []
for (let i = 0; i < clearCode; i++) {
table.push({
code: i,
value: [i]
})
}
table.push({
code: clearCode,
value: ['Clear Code']
}, {
code: clearCode + 1,
value: ['EOI']
})
return table
}
const isInCodeTable = (val, codeTable) => {
return !!codeTable.find(item => item.value.join(',') === val.join(','))
}
const pushCodeTable = (value, codeTable) => {
const lastCode = codeTable.at(-1).code
codeTable.push({
code: lastCode + 1,
value
})
return lastCode + 1
}
const getCodeByIndexBuffer = (indexBuffer, codeTable) => {
const item = codeTable.find(item => item.value.join(',') === indexBuffer.join(','))
if (!item) {
console.error('The code of the Index Buffer in the code table cannot be found', `${indexBuffer.join(',')}`, codeTable)
return
}
return item.code
}
const pushCode = (code, context) => {
context.codeStream.push(code)
context.bitStream.unshift(...decimal2Uint8Array(code, context.firstCodeSize))
}
const packedBytes = (bitArray, minCodeSize) => {
const bytes = []
const temp = []
let idx = bitArray.length - 1
const result = []
while (idx >= 0) {
if (temp.length === 8) {
pushBytes((uint8Array2decimal(temp)))
temp.length = 0
}
temp.unshift(bitArray[idx--])
}
if (temp.length !== 0) {
pushBytes((uint8Array2decimal(temp)))
}
function pushBytes (byte) {
bytes.push(byte)
if (bytes.length >= 255 - 1) {
result.push(255 - 1, ...bytes)
bytes.length = 0
}
}
if (bytes.length > 0) {
result.push(bytes.length, ...bytes)
}
return [minCodeSize, ...result, 0]
}
// <收集器> 创建收集器
function createStepCollection (indexStream) {
const localIndexStream = [...indexStream]
let step = 0
const steps = []
function displayIndexStream (idx, indexBufferIndexes, kIdx) {
let val = '<div>'
const separator = Math.max(0, indexBufferIndexes[0] ?? (kIdx === -1 ? idx : kIdx))
const displayValue = localIndexStream.slice(separator, separator + 10)
val += '<div style="text-align: left">'
displayValue.forEach((value, index) => {
val += `<span class="${indexBufferIndexes.includes(index + separator) ? 'buffer' : index + separator === kIdx ? 'k' : ''}">${value}</span>`
})
val += '</div><div class="popover"><div class="left">'
const left = localIndexStream.slice(0, separator)
const right = localIndexStream.slice(separator)
left.forEach(item => {
val += `<span class="has-been-read">${item}</span>`
})
val += '</div><div class="right">'
const { length } = left
right.forEach((item, index) => {
val += `<span class="${indexBufferIndexes.includes(index + length) ? 'buffer' : index + length === kIdx ? 'k' : ''}">${item}</span>`
})
return val + '</div></div></div>'
}
return {
steps,
collect (action, idx, indexBufferIndexes, kIdx, newCodeTableRow, codeStream) {
steps.push({
step: step++,
idx,
action,
kIdx,
indexBufferIndexes: [...indexBufferIndexes],
newCodeTableRow,
codeStream: [...codeStream]
})
},
display () {
const oTable = document.createElement('table')
oTable.classList.add('step-table')
oTable.setAttribute('border', '1')
oTable.innerHTML =
`<thead>
<tr>
<th>Step</th>
<th>Action</th>
<th>Index Stream</th>
<th>New Code Table Row</th>
<th>Code Stream</th>
</tr>
</thead>`
let innerHTML = '<tbody>'
steps.forEach(({ step, idx, action, indexBufferIndexes, kIdx, newCodeTableRow, codeStream }) => {
innerHTML +=
`<tr>
<td>${step}</td>
<td>${action}</td>
<td>
<div class="index-stream-wrapper">
${displayIndexStream(idx, indexBufferIndexes, kIdx)}
</div>
</td>
<td>${newCodeTableRow ? `#${newCodeTableRow.code} - ${newCodeTableRow.value.join(' ')}` : ''}</td>
<td>${codeStream.map(val => `#${val}`).slice(0, 10).join(' ') + (codeStream.length > 10 ? '...' : '')}</td>
</tr>`
})
oTable.innerHTML += innerHTML + '</tbody>'
document.querySelector('#app').appendChild(oTable)
console.log(steps)
}
}
}
收集表格中的 css 样式:
css
.step-table {
border-collapse: collapse;
}
:is(.step-table) td, th {
text-align: left;
}
.buffer {
background-color: rgb(208, 94, 94, .9);
color: #fff;
}
.k {
background-color: rgb(80, 80, 224, .9);
color: #fff;
}
.has-been-read {
color: #ccc;
}
.index-stream-wrapper {
position: relative;
font-size: 16px;
line-height: 16px;
}
.index-stream-wrapper span {
display: inline-block;
width: 24px;
height: 20px;
text-align: center;
line-height: 20px;
}
.index-stream-wrapper .left,
.index-stream-wrapper .right {
display: inline-block;
white-space: nowrap;
background-color: #f1f1f1;
border-top: 1px solid #ddd;
border-bottom: 1px solid #ddd;
box-sizing: border-box;
}
.index-stream-wrapper .popover {
position: absolute;
left: 0;
top: 0;
display: none;
}
.index-stream-wrapper:hover .popover {
display: block;
}
.index-stream-wrapper .popover .left {
position: absolute;
right: 0;
top: 0;
color: #ccc;
}
.index-stream-wrapper .popover .right {
position: absolute;
left: 0;
top: 0;
}
compress() 代码:
js
const compress = (indexStream, minCodeSize) => {
const context = createContext(indexStream, minCodeSize)
let indexBuffer = []
let k
let isInitialized = true
// <收集器> 用于收集器中标记相关索引
let indexBufferIndexes = []
// 2. 输出 Clear Code 到 Code Stream 中
pushCode(2 ** minCodeSize, context)
// 3. 从 Index Stream 中读取第一个值,并把它放到 Index Buffer 里面;
indexBuffer.push(context.read())
// <收集器> 收集
indexBufferIndexes.push(context.index - 1)
context.collect('Init', indexBufferIndexes, -1, null)
while (!context.isEnd()) {
if (!isInitialized) {
// 重置 code stream、code table 和最小代码,如同开启一张新的图片
context.reset()
isInitialized = true
} else {
// 5. 从 Index Stream 中读取下一个值,命名为 K
k = context.read()
// <收集器> 收集
context.collect('Read', indexBufferIndexes, context.index - 1, null)
// 6. Index Buffer 和 K 组成的值是否在 Code Table 中
if (isInCodeTable([...indexBuffer, k], context.codeTable)) {
// 6.1.1. 把 K 放到 Index Buffer 后面
indexBuffer.push(k)
// <收集器> 收集
indexBufferIndexes.push(context.index - 1)
context.collect('Found', indexBufferIndexes, -1, null)
} else {
// 6.2.1. Code Table 新增一行数据,code 自增,value 为 Index Buffer + K
const lastCode = pushCodeTable([...indexBuffer, k], context.codeTable)
// 6.2.2. 将 Index Buffer 中的代码输出到 Code Stream
pushCode(getCodeByIndexBuffer(indexBuffer, context.codeTable), context)
// 6.2.3. Index Buffer 设置为 K
indexBuffer = [k]
// 6.2.4. K 设置为 null
k = null
// <收集器> 收集
indexBufferIndexes = [context.index - 1]
context.collect('Not Found', indexBufferIndexes, -1, context.codeTable.at(-1))
// 当 code table 增加 4096 时,需要重置 Code Table、Code Stream 和 firstCodeSize
// 并且发出一个 clear code 到代码表
if (lastCode > 0xFFF) {
isInitialized = false
pushCode(2 ** minCodeSize, context)
}
// 当 code table 增加了一个大于或等于 2 ^ firstCodeSize 的值时
// 需要多一个位来存储数据
if (lastCode >= 2 ** context.firstCodeSize) {
context.increase()
}
}
}
}
// 8. 输出 Index Buffer 中的内容到 Code Stream
pushCode(getCodeByIndexBuffer(indexBuffer, context.codeTable), context)
// 9. 输出 End of Information Code 到 Code Stream
pushCode(2 ** minCodeSize + 1, context)
// 展示步骤表
context.codeUnits.forEach(({ stepCollection }) => stepCollection.display())
return packedBytes(context.bitStream, minCodeSize)
}
调用 compress() 方法:
js
const indexStream = [
0, 0, 0, 0, 0, 2, 2, 2, 2, 2,
0, 0, 0, 0, 0, 2, 2, 2, 2, 2,
0, 0, 0, 0, 0, 2, 2, 2, 2, 2,
0, 0, 0, 0, 0, 2, 2, 2, 2, 2,
0, 0, 0, 0, 0, 2, 2, 2, 2, 2,
1, 1, 1, 1, 1, 3, 3, 3, 3, 3,
1, 1, 1, 1, 1, 3, 3, 3, 3, 3,
1, 1, 1, 1, 1, 3, 3, 3, 3, 3,
1, 1, 1, 1, 1, 3, 3, 3, 3, 3,
1, 1, 1, 1, 1, 3, 3, 3, 3, 3
]
const bitStream = compress(indexStream, 2)
解压
在理解了 compress() 的代码后,解压就很容易了,无非就是把数据反过来解析。
以下在压缩环节拿到的最终 Bytes 数据:
plain-text
2 23 132 45 153 135 42 12 220 99 18 202 128 241 216 59 107 62 120 1 24 122 164 72 22 0
可以拆解一下这段数据:第一个字节 2 是 LZW Minimum code size,第二个字节 23 是 Bytes Length,接下来的 23 个字节就是一行数据,最后一个 0 则是 Teminator,如下面的代码所示
js
const parseBytes = (bytes) => {
const _bytes = [...bytes]
const minCodeSize = _bytes.shift()
const subBlocks = []
let len = _bytes.shift()
while (len !== 0) {
subBlocks.push(_bytes.splice(0, len))
len = _bytes.shift()
}
return {
minCodeSize,
subBlocks,
terminator: len
}
}
const image = parseBytes(bytes)
// image:
// {
// minCodeSize: 2,
// subBlocks: [
// [132, 45, 153, 135, 42, 12, 220, 99, 18, 202, 128, 241, 216, 59, 107, 62, 120, 1, 24, 122, 164, 72, 22]
// ],
// terminator: 0
// }
还记得在压缩的时候存在着一个 Code Table 吗?事实上,在解压缩的时候,我们同样也需要把这个 Code Table 重新建立起来,并且一步一步完善它。
在组织解压步骤前,还是需要定义几个术语:
- code:在 Code Stream 中正在处理的代码;
- prevCode:code 前面的代码;
- codeValue:code 在 Code Table 中对应的值;
- prevCodeValue:prevCode 在 Code Table 中对应的值。
例如:使用我们在压缩期间创建的代码表,如果 code 是 #7,那么 codeValue 就是 0 0 0。而 prevCode 就会是 #9,注意不是 #6(在压缩期间的步骤表中,我们在压缩 step 26 时,在 #9 后面加入了 #7。), prevCodeValue 就是 2 2。
下面给出解压缩的步骤:
- 初始化 Code Table;
- code 取 Code Stream 中的第一个代码;
- 输出 codeValue 到 Index Stream;
- 将 code 赋值给 prevCode;
- <循环点>
- code 取 Code Stream 中的下一个代码;
- 判断:code 是否在 Code Table 中
- 是
- 输出 codeValue 到 Index Stream;
- 设 K 为 codeValue 中的第一个索引;
- Code Table 新增一行,code 自增,value 为 prevCodeValue 和 K 组成的值;
- 将 code 赋值给 prevCode;
- 否
- 设 K 为 prevCodeValue 中的第一个索引;
- 输出 prevCodeValue 和 K 组成的值到 Index Stream;
- Code Table 新增一行,code 自增,value 为 prevCodeValue 和 K 组成的值;
- 将 code 赋值给 prevCode;
- 是
- 返回循环点。
还是得提一下 Code Stream 是怎么来的。在压缩时,我们将 Code Stream 转成了 Bit Stream 然后再转换成的 Bytes,所以现在我们可以直接反向操作再把 Bytes 转回 Code Stream。当然,我们并没有办法一步就完成这一转换,对于 Code Stream 的转换,是在循环的过程中,取到不同的 first code size 一步步取值完成转换的。
首先加入一个辅助函数,它用于读取 Bit Stream 的数据:
js
// bitReader.js
const decimal2Uint8Array = (num, size = 8) => {
const arr = new Uint8Array(size)
let len = size - 1
while (num > 0) {
arr[len--] = num % 2
num = num / 2 >> 0
}
return arr
}
const bytes2bitStream = (bytes) => {
const bitStream = []
for (let i = 0; i < bytes.length; i++) {
bitStream.unshift(...decimal2Uint8Array(bytes[i]))
}
return bitStream
}
export const createBitReader = (sourceBytes = []) => {
let bitsArray = bytes2bitStream(sourceBytes)
const readBits = (size) => {
const temp = []
if (size > bitsArray.length) {
throw new RangeError('No more bit to read.')
}
let len = size
while (len > 0) {
temp.unshift(bitsArray.pop())
len--
}
return uint8Array2decimal(temp)
}
const hasBits = (size = 1) => {
if (size > 12) {
throw new RangeError(`Size "${size}" out of range. (max size is 12)`)
}
return bitsArray.length >= size
}
const pushBytes = (sourceBytes) => {
// 如果还有剩余的数据没读完,需要保留到下一轮读取
bitsArray = [...bytes2bitStream(sourceBytes), ...bitsArray]
}
return {
readBits,
hasBits,
pushBytes
}
}
跟着步骤,简单地走几步,惯例先剧透一下步骤图(红色背景标记着 Code,而蓝色背景标记着 prevCode):
首先是初始化 Code Table,需要注意的是,在初始化的时候需要消耗掉 Clear Code 也就是 Code Stream 中的第一个 code #4;
接下来继续从 Code Stream 取 #0 并将它赋值给 Code,此时没有新增的 Code Table 行,Index Stream 为 0,prevCode 为 #4;
进入主循环,Code 取下一个代码为 #6,显然在此时 Code Table 还处于刚初始化的状态,不存在 #6 这一行,所以会走到*“否”*的分支:
-
将 prevCodeValue 中的第一个值赋值给 K,此时的 prevCode 是
#0,他对应的 prevCodeValue 可以在 Code Table 中找到,也就是[0],所以此时 K 应为0; -
然后是将 prevCodeValue 和 K 组成的值输出到 Index Stream,所以 Index Stream 现在的内容应该是
[0, 0, 0]; -
Code Table 新增一行,value 为 prevCodeValue 和 K 组成的值,最新的 Code Table 内容如下:
js[ { code: 0, value: [0] }, { code: 1, value: [1] }, { code: 2, value: [2] }, { code: 3, value: [3] }, { code: 4, value: ['Clear Code'] }, { code: 5, value: ['EOI'] }, { code: 6, value: [0, 0] } ] -
Code 赋值给 prevCode,值为
#6;
继续下一个循环,Code 取下一个代码为 #6,很明显,我们刚在上一步才加了上了 #6 这一行,所以这次会进入 “是” 分支:
-
codeValue 为
[0, 0],那么 Index Stream 最新内容应该是[0, 0, 0, 0, 0]; -
K 取 codeValue 中第一个值
0; -
Code Table 新增一行,value 为 prevCodeValue 和 K 组成的值,最新的 Code Table 内容如下:
js[ { code: 0, value: [0] }, { code: 1, value: [1] }, { code: 2, value: [2] }, { code: 3, value: [3] }, { code: 4, value: ['Clear Code'] }, { code: 5, value: ['EOI'] }, { code: 6, value: [0, 0] }, { code: 7, value: [0, 0, 0] } ] -
Code 赋值给 prevCode,值为
#6;
然后又会进入下一个循环,下面的步骤就不一一赘述了。需要注意的是,Code Table 中最大的 4095 限制,以及在新增时最后一个 code 超出 2 ^ firstCodeSize 时 firstCodeSize 需要自增来处理接下来的数据。
下面是完整的解压缩流程代码:
一些辅助函数:
js
const parseBytes = (bytes) => {
const _bytes = [...bytes]
const minCodeSize = _bytes.shift()
const subBlocks = []
let len = _bytes.shift()
while (len !== 0) {
subBlocks.push(_bytes.splice(0, len))
len = _bytes.shift()
}
return {
minCodeSize,
subBlocks,
terminator: len
}
}
const initCodeTable = minCodeSize => {
let clearCode = 2 ** minCodeSize
const table = []
for (let i = 0; i < clearCode; i++) {
table.push({
code: i,
value: [i]
})
}
table.push({
code: clearCode,
value: ['Clear Code']
}, {
code: clearCode + 1,
value: ['EOI']
})
return table
}
const createContext = (minCodeSize) => {
return {
firstCodeSize: minCodeSize + 1,
codeUnits: [],
get codeStream () {
return this.codeUnits.at(-1).codeStream
},
get codeTable () {
return this.codeUnits.at(-1).codeTable
},
get indexStream () {
return this.codeUnits.at(-1).indexStream
},
get stepCollection () {
return this.codeUnits.at(-1).stepCollection
},
pushCodeStream (code) {
this.codeStream.push(code)
},
pushIndexStream (val) {
this.indexStream.push(...(Array.isArray(val) ? val : [val]))
},
pushCodeTable (value) {
const lastCode = this.codeTable.at(-1).code
this.codeTable.push({
code: lastCode + 1,
value
})
return lastCode + 1
},
getValueByCode (code) {
const item = this.codeTable.find(item => item.code === code)
if (!item) {
throw new Error(`找不到对应的 code: ${code}`)
}
return item.value
},
isInCodeTable (code) {
return this.codeTable.find(item => item.code === code)
},
reset () {
this.firstCodeSize = minCodeSize + 1
this.codeUnits.push({
codeTable: initCodeTable(minCodeSize),
indexStream: [],
codeStream: [],
// <收集器> 创建收集器
stepCollection: createStepCollection()
})
},
increase () {
this.firstCodeSize++
},
// <收集器> 收集
collect (action, codeIndex, newCodeTableRow) {
this.stepCollection.collect(action, codeIndex, this.indexStream, newCodeTableRow)
}
}
}
// <收集器> 创建收集器
const createStepCollection = () => {
const steps = []
function collect (action, codeIndex, indexStream, newCodeTableRow) {
steps.push({
action,
codeIndex,
indexStream: [...indexStream],
newCodeTableRow
})
}
function displayCodeStream (codeIdx, codeStream) {
let val = '<div>'
const displayValue = codeStream.slice(0, 10)
val += '<div style="text-align: left">'
displayValue.forEach((value, index) => {
val += `<span class="${
codeIdx === 0
? index === 0 ? 'current' : ''
: codeIdx === index
? 'current'
: codeIdx === index + 1
? 'prev'
: ''
}">${value}</span>`
})
val += '</div><div class="popover">'
codeStream.forEach((item, index) => {
val += `<span class="${
codeIdx === 0
? index === 0 ? 'current' : ''
: codeIdx === index
? 'current'
: codeIdx === index + 1
? 'prev'
: ''
}">${item}</span>`
})
return val + '</div></div>'
}
function display (codeStream) {
const oTable = document.createElement('table')
oTable.classList.add('decompress-step-table')
oTable.setAttribute('border', '1')
oTable.innerHTML =
`<thead>
<tr>
<th>Step</th>
<th>Action</th>
<th>Code Stream</th>
<th>New Code Table Row</th>
<th>Index Stream</th>
</tr>
</thead>`
let innerHTML = '<tbody>'
steps.forEach(({ action, codeIndex, indexStream, newCodeTableRow }, index) => {
innerHTML += `
<tr>
<td>${index}</td>
<td>${action}</td>
<td>
<div class="code-stream-wrapper">
${displayCodeStream(codeIndex, codeStream)}
</div>
</td>
<td>${newCodeTableRow ? `#${newCodeTableRow.code} - ${newCodeTableRow.value.join(' ')}` : ''}</td>
<td>${indexStream.slice(0, 10).join(',')}</td>
</tr>
`
})
oTable.innerHTML += innerHTML + '</tbody>'
document.querySelector('#app').appendChild(oTable)
}
return {
steps,
collect,
display
}
}
步骤收集器的一些 css 样式:
css
.decompress-step-table {
border-collapse: collapse;
}
:is(.decompress-step-table) td, th {
text-align: left;
}
.current {
background-color: rgba(208, 94, 94, .9);
color: #fff;
}
.prev {
background-color: rgba(80, 80, 224, .9);
color: #fff;
}
.has-been-read {
color: #ccc;
}
.code-stream-wrapper {
position: relative;
font-size: 16px;
line-height: 16px;
}
.code-stream-wrapper span {
display: inline-block;
width: 24px;
height: 20px;
text-align: center;
line-height: 20px;
}
.code-stream-wrapper .popover {
position: absolute;
left: 0;
top: 0;
display: none;
white-space: nowrap;
background-color: #f1f1f1;
border-top: 1px solid #ddd;
border-bottom: 1px solid #ddd;
box-sizing: border-box;
}
.code-stream-wrapper:hover .popover {
display: inline-block;
}
decompress() 主代码:
js
const decompress = ({ minCodeSize, subBlocks }) => {
const br = createBitReader()
// 1. 初始化 Code Table;
const context = createContext(minCodeSize)
const clearCode = 2 ** minCodeSize
const eoiCode = clearCode + 1
// 最后一个添加到 code table 中的代码
let lastCode = eoiCode
let code
let prevCode
let codeValue
let prevCodeValue
let isInitialized = false
// <收集器> code stream 索引
let idx = 0
subBlocks.forEach(block => {
br.pushBytes(block)
while (br.hasBits()) {
// 2. code 取 Code Stream 中的第一个代码;
code = br.readBits(context.firstCodeSize)
if (code === eoiCode) {
// 重组 code stream,输出结束代码
context.pushCodeStream(eoiCode)
// <收集器> 收集
context.collect('End', idx++, null)
break
} else if (code === clearCode) {
// 遇到 clear code 时,重启一个新的单元
context.reset()
// <收集器> 收集
context.collect('Clear', idx++, null)
} else if (!isInitialized) {
// 3. 输出 codeValue 到 Index Stream;
context.pushIndexStream(context.getValueByCode(code))
isInitialized = true
// <收集器> 收集
context.collect('Init', idx++, null)
} else {
let k = 0
// 7. 判断:code 是否在 Code Table 中
const hasCode = context.isInCodeTable(code)
if (hasCode) {
codeValue = context.getValueByCode(code)
// 7.1.1. 输出 **codeValue** 到 **Index Stream**
context.pushIndexStream(codeValue)
// 7.1.2. 设 **K** 为 **codeValue** 中的第一个索引
k = codeValue[0]
} else {
prevCodeValue = context.getValueByCode(prevCode)
// 7.2.1. 设 **K** 为 **prevCodeValue** 中的第一个索引;
k = prevCodeValue[0]
// 7.2.2. 输出 **prevCodeValue** 和 **K** 组成的值到 **Index Stream**;
context.pushIndexStream([...prevCodeValue, k])
}
// 最大代码是 12,当代码表中放置了 #4095 值之后,需要重置代码表计数
// 它下一个代码(如果还有)必定会是 clear code
if (lastCode < 0xFFF) {
lastCode++
// [7.1.3][7.2.3]
// Code Table 新增一行,code 自增,
// value 为 prevCodeValue 和 K 组成的值;
context.pushCodeTable([...context.getValueByCode(prevCode), k])
// <收集器> 收集
context.collect(hasCode ? 'Found' : 'Not Found', idx++, context.codeTable.at(-1))
if (lastCode >= 2 ** context.firstCodeSize - 1 ) {
// 当 code table 增加了一个大于或等于 2 ^ firstCodeSize 的值时
// 需要多一个位来存储数据
context.increase()
}
}
}
// 重组 code stream
context.pushCodeStream(code)
// [4][7.1.4][7.2.4]
// 将 code 赋值给 prevCode;
prevCode = code
}
})
// 展示步骤表
context.codeUnits.forEach(({ stepCollection, codeStream }) => stepCollection.display(codeStream))
return context.codeUnits
}
调用 decompress() 方法:
js
const bytes = [2, 23, 132, 45, 153, 135, 42, 12, 220, 99, 18, 202, 128, 241, 216, 59, 107, 62, 120, 1, 24, 122, 164, 72, 22, 0]
const image = parseBytes(bytes)
decompress(image)
经过解压之后,会得到这样的一个 Index Stream:
plain-text
0 0 0 0 0 2 2 2 2 2
0 0 0 0 0 2 2 2 2 2
0 0 0 0 0 2 2 2 2 2
0 0 0 0 0 2 2 2 2 2
0 0 0 0 0 2 2 2 2 2
1 1 1 1 1 3 3 3 3 3
1 1 1 1 1 3 3 3 3 3
1 1 1 1 1 3 3 3 3 3
1 1 1 1 1 3 3 3 3 3
1 1 1 1 1 3 3 3 3 3
看起来很熟悉对不对?没错,它就是我从压缩那里复制下来的(不是)。拿到 Index Stream 后,组合图像数据中的颜色表以及其它的参数,我们就可以把这一帧的图片给还原出来了。
最后
事实上,我只告诉了你怎么去读取、压缩、解压缩相关的数据,但并没有告诉你这样做了之后有什么作用。
你没有猜错,这篇文章并不会包含这些内容,在 完整的 GIF 解析 Github 源码 中的 example 里面我做了一些小案例,包括但不限于:
- 重组 GIF 图像,修改每一帧的延时时长、每一帧每一个像素点的内容(体现在 canvas 的 ImageData 中);
- 多张图片拼合成一个新的 GIF 图片;
- 表情包增加文案;
- 等等…